The holidays are just around the corner, and there’s nothing quite like the magic of a home glowing with Christmas lights. Whether you want to outshine the whole neighborhood or stick to a simple, elegant display, getting those lights onto your roof can feel like a daunting task. After all, no one wants to risk falling off a ladder or accidentally turning their roof into a pin cushion.
At Black Hill Roofing, we’re all about helping you keep your home (and your sanity) intact. So if you’re wondering how to hang Christmas lights on your roof safely, effectively, and without damaging your home, you’re in the right place. Let’s walk through the best way to light up your roof this holiday season—without the hassle.
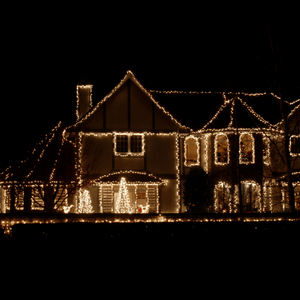
Make Your Roof the Star of the Neighborhood This Season
The truth is, a well-lit home can turn heads and bring smiles, but the process of hanging Christmas lights? That’s where many homeowners start to stress. You might be asking yourself:
- How do I hang lights without damaging my roof?
- What kind of lights should I use?
- How do I do this safely without a trip to the ER?
The good news? Hanging lights doesn’t have to be complicated or dangerous. With a little planning, the right tools, and some smart techniques, you’ll have your house looking merry and bright in no time.
What You’ll Need: Tools and Supplies for Stress-Free Hanging
Before you climb up a ladder, make sure you have the right supplies. Trust us—being halfway up and realizing you forgot something is about as fun as untangling a 50-foot strand of lights.
Here’s your must-have checklist:
- Outdoor Christmas lights: Use lights that are specifically rated for outdoor use. LEDs are a great option—they’re energy-efficient, brighter, and last longer than traditional bulbs.
- Light clips: No nails or staples allowed! Light clips are inexpensive, easy to use, and designed to attach lights without damaging your roof, gutters, or siding.
- Extension cords: Make sure you have outdoor-rated extension cords and enough length to reach your power source.
- A sturdy ladder: Use a ladder that’s tall enough for your roof and stable enough to keep you safe. Pro tip: Have a buddy hold the base while you work.
- A timer: A smart timer can automate your lights so you don’t have to climb out of bed at 10 p.m. to turn them off.
With everything ready, you’re set up for success—and fewer trips up and down the ladder.
From Classic to Dazzling: Choose the Best Lights for Your Home
The right lights can make your home look stunning, but there are plenty of options out there. Here’s a quick guide to help you pick:
- C9 Bulbs: These are the big, colorful bulbs you see on classic displays. They’re bold, bright, and perfect for outlining your roofline.
- Icicle Lights: Great for creating that winter wonderland look, especially along gutters or eaves.
- Net Lights: If you’ve got bushes or shrubs, net lights make decorating a breeze.
- LED Lights: Available in all shapes and colors, LED lights are energy-efficient and stay cool to the touch—perfect for Texas weather.
Pick a style that fits your personality and your home’s aesthetic. Want a clean, classic look? Stick to warm white bulbs. Feeling bold? Go for multi-colored lights and mix in some fun patterns.
Map It Out: How to Plan a Picture-Perfect Light Display
Before you climb up the ladder, plan your light display. Trust us—winging it is a recipe for frustration.
- Measure your roofline. Grab a tape measure and note the length of your gutters, peaks, and any other areas where you want lights. This ensures you’ll have enough strands to cover your space.
- Sketch your design. It doesn’t have to be fancy—just a rough idea of where you want lights to go. Focus on key areas like the roofline, gutters, and peaks.
- Test your lights. Before hanging them, plug in each strand to make sure all the bulbs work. It’s much easier to fix on the ground than on the roof!
This little bit of prep work can save you a ton of time and stress. Plus, your display will look much cleaner and more intentional.
Stay Safe Up There: Avoid Slips, Trips, and Roofing Mishaps
Now that you’re ready to hang lights, let’s talk about safety. Working on a ladder or roof can be dangerous, so take these precautions:
- Use a stable ladder: Place it on level ground, and always have someone hold it steady while you climb.
- Wear proper shoes: Sneakers or work boots with good grip are essential—no flip-flops or slippery shoes.
- Work during daylight hours: Don’t try to hang lights at night. Wait for clear, dry weather and good visibility.
- Use light clips: Skip the staples, nails, or adhesives. They might hold lights in place, but they can damage your roof and void warranties.
If you’re nervous about climbing up, consider hiring professionals to handle it. There’s no shame in letting someone else do the heavy lifting—especially if it keeps you safe.
From Start to Shine: A Foolproof Way to Hang Christmas Lights
Ready to get started? Follow these simple steps:
- Start with the power source. Plug in your first strand of lights to ensure it works as you go. This also helps you figure out where your extension cords will connect.
- Attach light clips. Hook the lights into the clips and attach them to the roof’s edge, gutters, or fascia. Clips keep the lights secure without damaging your home.
- Work from the ground up. Start at a corner and move outward. Take your time, and don’t overreach—climb down and reposition the ladder when needed.
- Keep cords tidy. Use clips or ties to secure cords so they’re not dangling or creating tripping hazards.
Once you’re done, step back and admire your handiwork. Your roof should be shining bright and ready to make Santa proud!
How to Hang Christmas Lights Without Hurting Your Roof
One of the biggest mistakes homeowners make is using the wrong tools to hang Christmas lights. Nails, staples, and adhesives can tear shingles, damage gutters, and create leaks—things no one wants to deal with during the holidays.
Here’s how to avoid roof damage:
- Use plastic light clips to attach lights securely without leaving marks.
- Avoid walking on the roof whenever possible. If you need to access peaks or tricky areas, call a professional.
- Keep lights and cords away from sharp edges or vents to prevent fraying or damage.
Your roof is built to last, but it still deserves a little TLC—especially during the holidays.
Removing Lights the Right Way (Without the Tangle)
When January rolls around, taking the lights down can feel like a chore. But a little care now makes next year’s setup easier:
- Work backward. Remove clips and lights in the reverse order of how you put them up.
- Stay organized. Wrap each strand of lights around a piece of cardboard or a spool to keep them untangled.
- Inspect as you go. Look for any burned-out bulbs or damaged cords and repair them before packing everything away.
Trust us—your future self will thank you.
Shine Bright This Season With a Safe and Stunning Roof Display
Hanging Christmas lights on your roof doesn’t have to be stressful or risky. With the right tools, a solid plan, and a focus on safety, you’ll have a glowing holiday display that makes your home the envy of the neighborhood.
At Black Hill Roofing, we’re here to help you keep your roof in tip-top shape—before, during, and after the holiday season. If you’re worried about your roof’s condition or need an inspection before you start decorating, give us a call. We’ll make sure your roof is ready to handle both Christmas lights and Santa’s sleigh.
Happy holidays from all of us at Black Hill Roofing! Stay safe, stay merry, and let your home shine bright this season.